We have a nifty little Polish deli near us. And after a desperation Hail Mary one night for dinner where I gambled and brought home a few items I was hoping they’d enjoy, they decided they love Polish food.
Little Miss inhales cabbage rolls almost as fast as I do (my favorite Polish food ever), and the rest isn’t far behind.
So of course they decided they wanted me to cook the Polish food for them, starting with the pierogies. Being the sucker that I am, I made them pierogies. From scratch. In two flavors – traditional potato and cheese, as well as a meat pierogi.
I decided to do a double batch, knowing that it’s a somewhat drawn out process and I wasn’t going to make only a few. And three hours later, I had over 70 pierogies.
Pierogies aren’t something to make on a whim. They take time to create, since you’re filling each one individually and boiling just a few at a time.
There are a period of time when the wee ones were eating them faster than I could make them, but they eventually got full, Little Miss after nine pierogies and Mister Man after eleven.
So yes, both flavors were a hit. The recipe isn’t hard, but like much Old World traditional cooking, it takes a little bit of time and patience.
But oh my word is it worth it.

Some links in this article are affiliate links that may earn me a commission if you purchase through them.
How to Make Homemade Pierogies
Place the flour and salt in a bowl and stir until combined.
Add the egg, oil and water and stir with a stand mixer or by hand until a soft dough has formed.
At this point, either turn it out onto a table to knead it until it is softly elastic – which will happen quickly and in much less time than with bread dough – or use a dough hook on your stand mixer to knead it for just a couple minutes. Be careful not to knead too much or the dough will get tough.
Let the dough rest for 15-20 minutes (or longer), covered with a barely damp cloth.
Have your filling prepared and ready to go, then roll your dough on a floured surface until it is about an eighth of an inch thick. Use a large biscuit cutter to cut out a few rounds at a time.
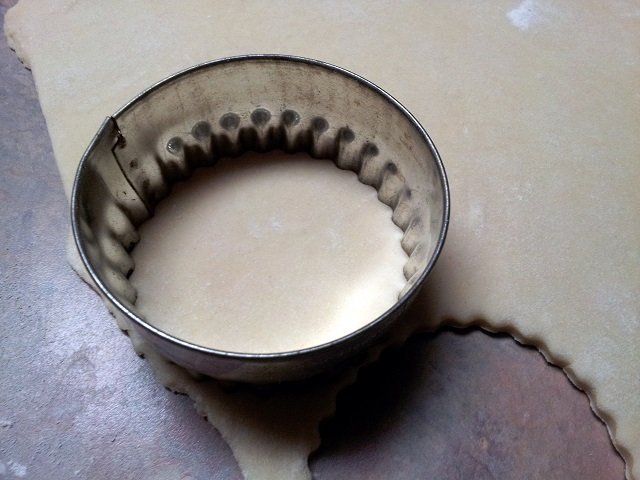
Gently stretch the rounds in your hand to make them a little thinner and slightly larger, being careful not to rip the dough.
Place a teaspoon of filling into the center of the round while it is cradled in the palm of your hand. Pull the edges out and towards each other, crimping them together as you go.
Do not overfill the rounds, and be sure to get a good seal. If the filling won’t stay inside, use a little less in the next one, as the dough doesn’t stick together well where the filling has touched it.

Have a pot of water start boiling while you begin making the pierogies. I found it was fastest to make three or four pierogies, then add them to my large pot, stirring to ensure they don’t stick to the bottom, while I make another pierogi.
When I finish the new pierogi, I check on the pierogies cooking. If they have floated to the top, they are done. If not, I make another pierogi.
When the pierogies have floated to the top and are finished cooking, use a slotted spoon or spider to pull them out and let them drain in a colander to ensure they don’t get soggy. Do not lay them atop each other, or they will stick together.

Use melted butter in a large pan (or grapeseed oil to keep them dairy free) to prevent them from sticking. Cover the storage container after you add each one to keep them warm.
Serve immediately with garnishes, as you choose. We garnished with herbs, but bacon is also wonderful.
Homemade Pierogies Meat Filling
Brown one pound of ground beef (or use leftover ground beef – turkey, pork or veal work, too – or any combination of the above).
Drain the meat and add to a food processor. Chop a medium onion and add it to the food processor. Pulse 10 to 15 times, until the mixture is fully combined and the onions are minced.
Add 1 egg and 3/4 cup chicken or beef stock. Pulse another three to four times, and your filling is ready.
Feel free to make this in advance and pull it from the fridge when you are ready to make your pierogies. The filling isn’t pretty, but it’s incredibly tasty.
Homemade Pierogies Traditional Potato and Cheese Filling
Peel three smallish (or 2 large) baking potatoes. Cut and boil them as if you were going to make mashed potatoes.
Rice them, add a touch of chicken stock, and stir to make thick mashed potatoes. Add 1/4 cup shredded cheddar cheese and stir again until the cheese has melted.
If you don’t have a ricer, mash as you usually would – the ricer keeps them airy and fluffy. Eliminate the cheese or use a vegan cheese to keep them dairy free.
What’s your favorite filling for homemade pierogies?

Homemade Pierogies
Ingredients
- 2 3/4 cups flour
- 1/2 teaspoon salt
- 1 egg
- 2 teaspoons oil
- 3/4 cup warm water
Instructions
- Place flour and salt in a bowl and stir until combined.2 3/4 cups flour, 1/2 teaspoon salt
- Add egg, oil, and water and stir until a soft dough forms. Knead by hand or with a dough hook until softly elastic.1 egg, 2 teaspoons oil, 3/4 cup warm water
- Let the dough rest for 15-20 minutes, covered with a barely damp cloth. Start water boiling while dough rests.
- Have filling prepared (see notes) and ready to go, then roll dough on floured surface until 1/8″ thick. Use a large biscuit cutter to cut out a few rounds at a time.
- Gently stretch the rounds, being careful not to rip the dough. Place a teaspoon of filling into the center of the round. Pull edges out and towards each other, crimping together as you go.
- Make 3-4 pierogies, then add them to pot, while you make the next pierogi. Remove finished pierogies from water as you add new ones.
- When the pierogies float to the top, use a slotted spoon or spider to remove, then drain in a colander without touching.
- Use melted butter in a large pan to prevent them from sticking. Cover the storage container after you add each one to keep them warm. Serve immediately with garnishes, as you choose.


Notes
- Meat filling: Brown one pound of ground beef (or use leftover ground beef – turkey, pork or veal work, too – or any combination of the above). Drain the meat and add to a food processor. Chop a medium onion and add it to the food processor. Pulse 10 to 15 times, until the mixture is fully combined and the onions are minced. Add 1 egg and 3/4 c chicken or beef stock. Pulse another three to four times, and your filling is ready. Feel free to make this in advance and pull it from the fridge when you are ready to make your pierogies. The filling isn’t pretty, but it’s incredibly tasty.
- Traditional potato and cheese filling: Peel three smallish (or 2 large) baking potatoes. Cut and boil them as if you were going to make mashed potatoes. Rice them, add a touch of chicken stock, and stir to make thick mashed potatoes. Add 1/4 c shredded cheddar cheese and stir again until the cheese has melted. If you don’t have a ricer, mash as you usually would – the ricer keeps them airy and fluffy. Eliminate the cheese or use a vegan cheese to keep them dairy free.
- For more tips and tricks, be sure to read the full article above.
Nutrition
This site uses an online source to provide nutrition estimates as a courtesy. If you need exact values, please calculate yourself.
I am a participant in the Amazon Services LLC Associates Program, an affiliate advertising program designed to provide a means for sites to earn advertising fees by advertising and linking to Amazon.com.
I just recently made piergoies for the first time. We’ve always loved them and they were a huge hit! I did find it easier though to make all of the pierogies first before I boiled and then fried them.
You should try ricotta in your pierogies, it mixes great with potatoes (same texture) and turns gooey when boiled and then fried.
So glad I’m not the only one who makes them. They were a long time in the making but oh so good. I may have to try making them all first and then boiling them.
The only issue with ricotta is the dairy allergy for Little Miss, but … I could always make some just for ME, right?
These sound soooo good! I wanted to add also that it is a beautifully done post – great formatting and photos!
Thank you, Robyn! These are the things that make my day 🙂 And oh were they delicious 🙂
Mmmm, I can’t wait to try these. My girls and I love pierogies, but I have never tried making them myself. These look so perfect!
Mmmm, yes! I made these…a little variation in the filling thanks to my Lithuanian friend and her grandmother’s recipe, but these were outstanding. Thanks Michelle for giving me the inspiration. I don’t think I’ll ever buy the frozen ones again. Lol. There are so many variations you can do with the filling. I will like to try a meat filling like yours next time. We’re sharing here, right?… http://havethymetocook.blogspot.com/2013/03/pierogies.html
Thanks, Jon! So glad you enjoyed them, and yes, there are so many possibilities for fillings depending on what you feel like. You can even skip the savory and go straight to sweet fillings if you like. It’s ALL good. Literally.
Hi Michelle,
I am responding to a 5 yr. Old comment about a Jon who said he has a Lithuanian friend who gave him a variation on his cabbage pierogis but did not pass it on, even after saying “We’re sharing here right?…..
Can you spread a little light on what it was?
Jim
Unfortunately, I really don’t know. Unless readers leave the details in a comment, I am not sure what they intended. And in this case, I don’t have the variation. Bummer!
Hi Jim,
The link to my recipe is just below the comment.
Oh my gosh! I’ve been making Pieogies for years! I make them, boil them, dry them and freeze them. I, then, take them out of the freezer bag when ready and sautee them in butter or oil. YUMMO! No need to buy frozen, expensive ones at the store. Just make them yourself. They are PERFECT for when you want a meal and pressed for time!
Hiya! Just wanted to add that in Polish, pierogi is the plural so there is no need to put pierogies 🙂
Also sweet pierogi with apple and blueberry is delicious! Especially with soured cream xxx
You’re right – it is. It’s totally force of habit because clearly I’m not Polish myself 🙂 I do at least do packzi correctly though! And yes sweet pierogi are amazing and delicious, too. I need to make some of those soon!