This shop sharing two recipes for pizza dipping sauces has been compensated by Collective Bias, Inc. and its advertiser. All opinions are mine alone. #TeamPizza #CollectiveBias #cbias

It’s that time of year where we’re spending a lot of time watching football playoffs. And while there is a time and a place for homemade pizza with dough and sauce I make from scratch and roll out and put together one at a time, while teams are fighting to reach the next level is not that time. Nope, that’s when dinner needs to be quick and easy – and preferably eaten with our hands so that we don’t have to worry about pesky forks and knives.
But of course I still want to dress it up a little and make it fun because that’s who I am. So don’t tell anyone, but these pizza dipping sauces are as easy to make as they are to eat. And dessert just needs to be thawed in the fridge and sliced. Easy peasy done, but I can still change things around so they look more fancy than “just” pizza and that makes our football parties even more fun for everyone.

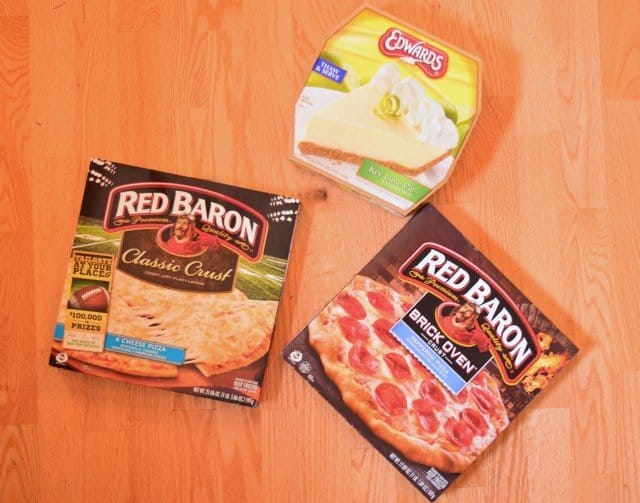
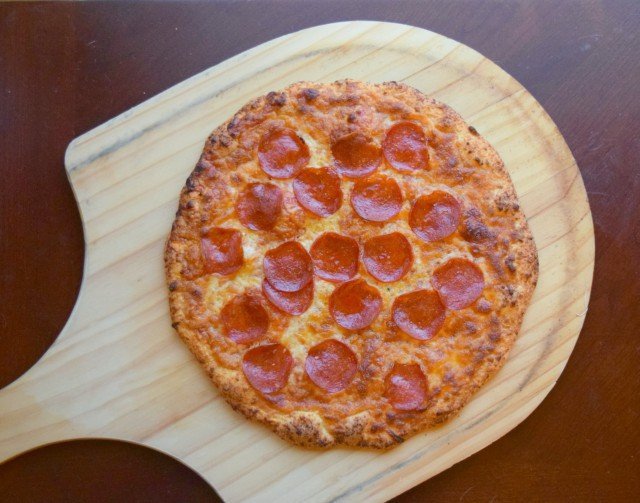
Knowing that not everyone has the same tastes, I always do my best to provide options. When I head to Walmart to pick up my Red Baron frozen pizzas, I get at least two kinds (depending on how many guests we’re hosting) every time. This time around, I grabbed Red Baron Classic Crust 4-Cheese and Red Baron Brick Oven Pepperoni for my guests. Granted, my Edwards frozen pie is always key lime because key lime pie is the best thing ever, and if (ha!) I’m going to have leftovers, it’s going to be my favorite. I sort of consider that my own little reward for the work I do in putting together the football parties every weekend. It’s only fair, right? Fortunately, the Red Baron pizzas are only $3.50 at Walmart and have a ton of varieties, so we can always find something new and different.

And the pizza dipping sauces? I do the same thing. Little Miss loves tomato anything, while Mister Man doesn’t. So the sundried tomato dipping sauce was a definite, and I also created a super easy garlic cream to ensure I have variety with my pizza dipping sauces. And darn, I had a little left over of each of them, so unfortunately, I’m going to have to pick up more pizza to ensure we use them up. My family was crushed when I announced this – NOT!
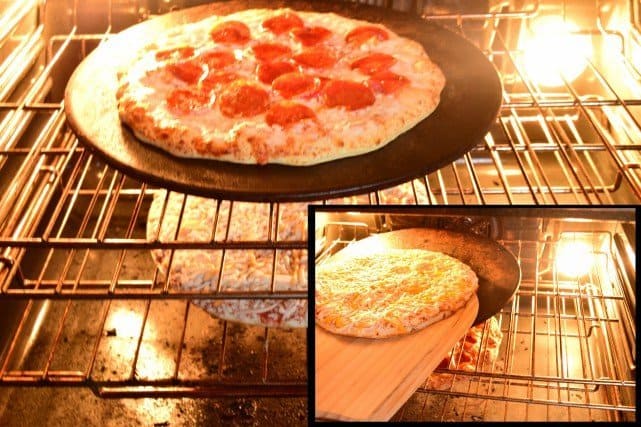
This weekend, my parents joined us to watch the games on Sunday, and I whipped up the pizza and the accompanying pizza dipping sauces before the game started while they were ostensibly playing cards. I love how I can use the oven to time this just about perfectly to roast the garlic for both pizza dipping sauces then keep the oven at the same temperature to cook the two pizzas at the same time (pro tip: rotate the racks they’re on halfway through baking to ensure they both cook evenly) while I’m making the two dipping sauces.
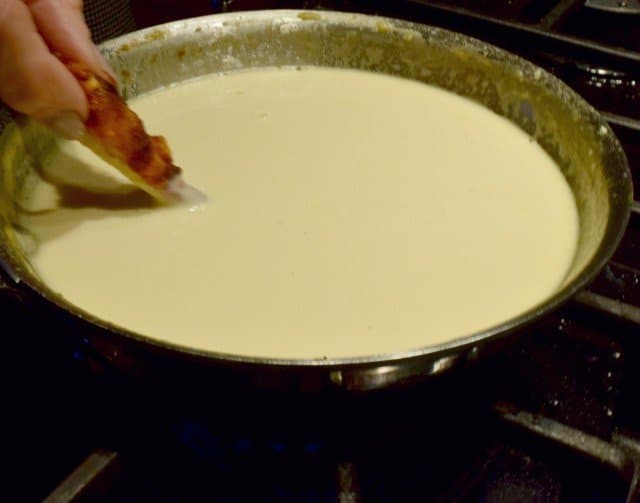
The only problem is that my mom wouldn’t wait while I made a separate dairy free pizza for Little Miss. She kept taking little pieces of the Red Baron pizzas and dipping them into the creamy garlic sauce I was keeping warm on the stove rather than waiting for game time and the “official” serving. But you know what? I’m kind of ok that I make something that’s so good and so fun people can’t wait to enjoy it. That’s a win, right?
And dessert? Just set it out with plates and a pie slicer, and a commercial break is enough time to get everyone served and happily resettled with some of the Edwards key lime pie I picked up, too. Oh this was a good night!

Pizza Dipping Sauces Duo
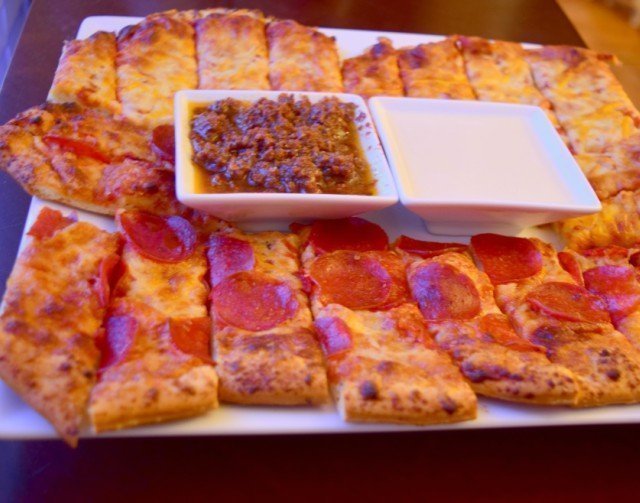
The best part of these pizza dipping sauces is that the duo both use roasted garlic. I adore roasted garlic, and it’s so easy to make and adds such great flavor to foods. I used most of the bulb for the creamy garlic dipping sauce and four of the cloves in the sundried tomato dipping sauce. I love finding any excuse I can to include roasted garlic in recipes, which is part of why my pantry always has multiple garlic bulbs in it.
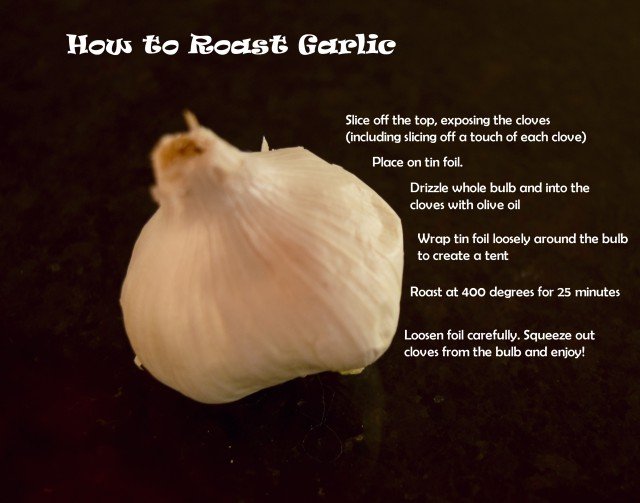
Seriously easy. Turn your oven to 400 degrees. Cut off the top of the garlic bulb so that the cloves are exposed, and place it on a square of tin foil like you’re going to wrap a present. Drizzle olive oil over the garlic bulb so it goes into the exposed cloves – less than a tablespoon – and pull up the corners of the tin foil to create a sealed tent around the bulb. Place that in the oven for 25 minutes. Once it’s roasted, carefully open the foil so you don’t burn yourself. Squeeze the bulb to remove the roasted cloves and enjoy!
Best of all, the pizzas go in the oven at the same 400 degree temperature to bake, so while your pizzas are baking, you can whip up those pizza dipping sauces.
Start with the creamy garlic dipping sauce, as it takes a little longer because it’s cooked. Remove 4 of the garlic cloves and set them aside. In a saucepan, add the olive oil and the remainder of the garlic bulb and turn the heat to medium. Let the garlic start to sizzle and use a fork to mash the roasted garlic. Add flour and stir to incorporate, cooking for another 3 minutes to cook out the raw taste of the flour.
Grab your whisk and slowly add the chicken stock, whisking as you go to ensure you create no lumps in your sauce. Once the stock is added, stir periodically, turning the heat down to medium low so that it doesn’t boil. (You can start the sundried tomato dipping sauce at this point, just returning to the stove to stir every few minutes.) Once it thickens and reduces to about half the volume, add the cream and whisk again. Give it another few minutes on low heat then blend. I have an immersion blender that works perfectly, but if you don’t, use a traditional blender ensuring you don’t fill it more than one-third full and that you use a kitchen towel to hold the top on to ensure the pressure doesn’t push the top off and burn you. Serve immediately. If you are not serving immediately, return the creamy garlic sauce to the stove and turn the heat as low as possible to keep it warm.

Creamy Garlic Pizza Dipping Sauce
Ingredients
- 1 bulb garlic roasted
- 2 tablespoons olive oil
- 2 tablespoons flour
- 3/4 cup chicken stock
- 1/3 cup cream
- salt and pepper to taste
Instructions
- Add olive oil and roasted garlic to a saucepan and turn heat to medium. As garlic begins to sizzle, use a fork to mash the cloves as best as possible and turn heat down slightly.2 tablespoons olive oil, 1 bulb garlic
- Add flour and cook two to three minutes, stirring periodically. Add chicken stock slowly, whisking constantly to ensure no lumps form. Ensure heat it as medium low so the sauce doesn't boil and stir occasionally until mixture has thickened and reduced volume by half.2 tablespoons flour, 3/4 cup chicken stock
- Add cream and stir to combine, reducing heat to low and cooking 2-3 minutes. Using an immersion blender or a traditional blender, blend until smooth. Add salt and pepper to taste.1/3 cup cream, salt and pepper
- Serve immediately or keep on low heat to keep the creamy sauce warm until ready to serve.
- Store in the refrigerator in a tightly sealed container up 3-4 days if needed.


Notes
- If you are not serving immediately, return the creamy garlic sauce to the stove and turn the heat to a low simmer (or as low as possible). Stir occasionally to prevent scorching. This will keep the sauce warm for serving later.
- For more tips and tricks, be sure to read the full article above.
Nutrition
This site uses an online source to provide nutrition estimates as a courtesy. If you need exact values, please calculate yourself.
The sundried tomato sauce is even easier. Add the sundried tomatoes and their oil to your food processor, along with the anchovy fillets (if you are anti anchovy, you can skip this but try it – you may be surprised!) and the four cloves of roasted garlic.

Process until all the big chunks are gone. This won’t be perfectly smooth, but you don’t want it to be. Just get it finely diced, which may require you scraping down the sides between bursts of processing. Scrape the dipping sauce into a bowl and add the olive oil. While you can use a lower quality olive oil in the creamy dipping sauce because you’re cooking it, which removes the finer notes in the flavor, you want to use a better olive oil for this raw application. Yes, I keep multiple kinds of olive oil in my pantry! Stir the olive oil into the sundried tomato sauce gently and serve.

Rather than cut your pizzas into traditional triangles, use a pizza wheel or knife to slice them into slivers then cut each sliver in half to make it more manageable. This helps make it less awkward when someone wants more sauce but doesn’t want to double dip, too. Plus, the strips of pizza make it an even more fun party food!
Sundried Tomato Pizza Dipping Sauce
Ingredients
- 1/2 cup sundried tomatoes packed
- 3 tablespoons oil from sundried tomatoes
- 2 anchovy fillets
- 4 cloves garlic roasted
- 1/4 cup olive oil
Instructions
- Add sundried tomatoes, oil from the jar, anchovy fillets, and garlic to the bowl of a food processor. Process until smooth, scraping down the bowl as needed.1/2 cup sundried tomatoes, 3 tablespoons oil from sundried tomatoes, 2 anchovy fillets, 4 cloves garlic
- Scrape the paste into a bowl. Drizzle olive oil over the sauce and stir gently to combine.1/4 cup olive oil
- Serve immediately. This will keep in the refrigerator for up to a week in a tightly sealed container.


Notes
- Make sure to use a quality olive oil. You want the grassy flavors to come through and not have a low-quality oil ruin the dip.
- For more tips and tricks, be sure to read the full article above.
Nutrition
This site uses an online source to provide nutrition estimates as a courtesy. If you need exact values, please calculate yourself.
Love the tutorial on how to roast garlic!!
That tomato dipping sauce with anchovies sounds AWESOME! I love it 🙂
SInea ♥
As much as I love garlic, I have never roasted it myself. Now I have to try this. #client