With Little Miss having been sick this week, I haven’t done a lot of new cooking. She’s spent the majority of the week not eating much and is attached to me like a barnacle.

When Grandpa called on Thursday to see how she was doing, he wanted to know if we’d made cookies yet – his cure-all. We hadn’t, but that put the bug in Little Miss’s ear. I talked her out of the standard chocolate chip cookies, and we pulled out our recipe books to see if we could find something we wanted to make.
We came up with two recipes. One was a new one that I tweaked (too overly sweet as it was written), and one was a cookie I used to make with my Gram.
Some links in this article are affiliate links that may earn me a commission if you purchase through them.
What’s the best way to keep cookies from sticking?
Always line your baking sheet with parchment paper or a silicone baking mat, which I personally prefer. This helps the cookies bake evenly and makes them easy to lift off the pan without breaking.
Don’t use foil, cooking spray, or wax paper, because the melted sugar will stick and ruin your cookies. Using the wrong surface can make cleanup a nightmare and waste your batch.
Do I need to shape the cookies right after baking?
Yes, you need to shape the cookies immediately after they come out of the oven. The cookies stay soft and flexible for only about a minute, so timing is critical.

Have your shaping glass ready before the timer goes off to press them while they’re still pliable. Acting quickly ensures each cookie keeps the perfect shape without cracking or sticking.
Can I move the cookies off the baking sheet right after baking?
No, you should leave the cookies on the baking sheet right after baking. They need a few minutes for the melted sugar to set up so the cookies hold their shape.
If you try to move them too soon, they can get crushed or break apart. Giving them this short rest ensures each cookie comes off the sheet perfectly intact and keeps your batch looking great.
Can I store these cookies in a regular container?
No, a regular container isn’t the best choice for these cookies. They are delicate and moisture-sensitive, so they need an airtight container to stay fresh and maintain their texture.
Place layers of parchment paper between the cookies to prevent them from sticking together. Storing them this way at room temperature keeps each cookie intact and ready to enjoy.
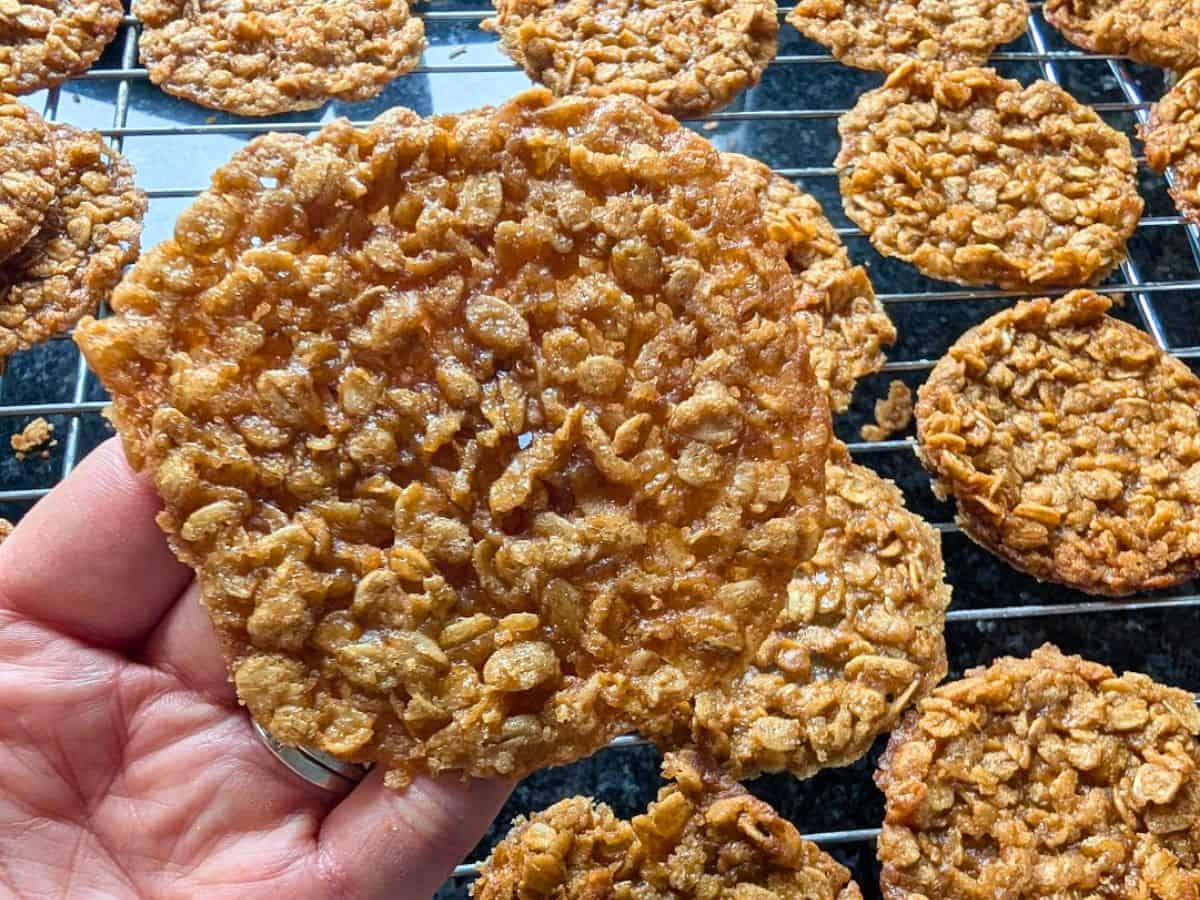
How to Make Lace Cookies
Preheat your oven to 350 degrees. Line your baking sheets with high-quality parchment paper or silicone baking mats to make sure the cookies don’t stick and to make cleanup much easier.
In a pot, gently melt the butter and add the brown sugar. Once the butter is mostly melted, remove it from the heat and keep stirring until it fully melts. This keeps the butter from getting too hot and allows you to add the egg without scrambling it.

Whisk in the egg and the vanilla extract until the mixture is completely incorporated and smooth. Make sure the egg and vanilla are evenly mixed throughout so the dough has a uniform texture.

In a separate bowl, mix together the oatmeal, flour, salt, and freshly grated nutmeg. Stir thoroughly so the dry ingredients are evenly distributed and no pockets of flour or spices remain.

Add the wet ingredients, and mix with a spatula until all the oats are evenly coated and a sticky dough forms. Take care to combine everything well so the dough is consistent without overmixing.

Use a small cookie scoop to ensure the cookies are all the same size, smaller than your normal cookie. I use my truffle size. Make sure to leave plenty of room between each scoop, as these cookies will spread out significantly while baking.


Bake for 8 to 10 minutes. Remove them from the oven when the edges are a beautiful golden brown and the centers are still soft.
The second you pull the pan out of the oven, take a round drinking glass, biscuit cutter, or large mug. Place it upside down over a hot cookie and gently swirl it around in a circular motion. The glass will lightly bump the molten edges and shape them into a perfect circle. Repeat for all cookies on the pan.

Let the cookies cool directly on the hot baking sheet for five minutes. Once they are slightly firm, use a thin spatula to carefully transfer them to a wire rack to cool completely.

Lace Cookies
Ingredients
- 1/2 cup unsalted butter melted
- 1/2 cup brown sugar packed
- 1/2 cup granulated sugar
- 1 egg large
- 1/2 teaspoon vanilla extract
- 2 cups oatmeal
- 3 tablespoons all-purpose flour
- 1/2 teaspoon salt
- 1/4 teaspoon nutmeg freshly grated
Instructions
- Preheat oven to 350°F Line baking sheets with parchment paper or silicone baking mats.
- In a pot, gently melt the butter and add the brown sugar. Once the butter is most of the way melted, remove it from teh heat and keep stirring until the butter fully melts. This keeps the butter from getting too hot and allows you to add the egg without scrambling it.1/2 cup unsalted butter, 1/2 cup brown sugar, 1/2 cup granulated sugar
- Whisk in the egg and vanilla until fully combined.1 egg, 1/2 teaspoon vanilla extract
- In a separate bowl, mix together the oatmeal, flour, salt, and freshly grated nutmeg.2 cups oatmeal, 3 tablespoons all-purpose flour, 1/2 teaspoon salt, 1/4 teaspoon nutmeg
- Add the wet mixture to the dry ingredients. Stir with a spatula until a sticky dough forms and the oats are evenly coated.
- Use a small cookie scoop to ensure the cookies are all the same size, smaller than your normal cookie. I use my truffle size. Make sure to leave plenty of room between each scoop, as these cookies will spread out significantly as they bake.
- Bake for 8 to 10 minutes until the edges turn golden brown.
- Immediately place a round glass, biscuit cutter, or mug upside down over each hot cookie and swirl gently to shape them into circles.
- Let cookies cool on the baking sheet for 5 minutes. Transfer to a wire rack with a thin spatula and cool completely.

Notes
- These cookies are delicate and very sensitive to moisture, so proper storage is important. Keep them in an airtight container at room temperature and place layers of parchment paper between the cookies to prevent them from sticking together.
- For more tips and tricks, be sure to read the full article above.
Nutrition
This site uses an online source to provide nutrition estimates as a courtesy. If you need exact values, please calculate yourself.

I am a participant in the Amazon Services LLC Associates Program, an affiliate advertising program designed to provide a means for sites to earn advertising fees by advertising and linking to Amazon.com.

Current Giveaways:
Family 4 pack of tickets to Ringling Brothers in Chicago at the UC November 17 here
Family Taco Night prize pack here
Wendy’s gift card here
Sounds yummy! I need to bake more.
Looks so good!!!
Michelle, thanks so much for your friendship, support and advice during my husband's job hunt. We're a little battle weary now, but we're trying to regroup and figure something out. I know we will get something one way or the other 🙂 Thanks again. Hugs!
Midwest Mommy – With the cold temperatures coming on, don't we all? 🙂
Kelly – They were really good. And I do mean *were*! I know you've been working hard trying to figure things out, but you'll get there. I have faith!
Yummy! I think I vaguely remember eating those in my childhood. Hmmm … I guess I just have to make them to be sure 😉
Brandie – I like the way you think. Yep, go make 'em JUST to be sure 😉