I had fresh bread for dinner last night. And the night before. And the night before. And possibly the night before. Now that fall is here and the weather has turned cooler, I’m using my oven again which means that I’m back to baking bread on a regular basis. While I sometimes make a traditional French baguette or a quick flatbread.
There are times, however, when I want a traditional bread with its crackly, crusty exterior and nice soft inside steaming from the oven. But I don’t have the ten minutes to get everything together, twenty to knead, an hour and a half for rise one, five to shape, another hour for the second rise, and a half hour to bake. Fortunately, I found a great solution.
And that’s why I’m having fresh bread almost every night of the week. No, my solution wasn’t a time machine, handy as that might be.

Some links in this article are affiliate links that may earn me a commission if you purchase through them.
How to Make No Knead Bread
This is an adaptation of a recipe I found in the book Artisan Bread in Five Minutes A Day by Jeff Hertzberg and Zoe Francois. They have an awesome methodology that I absolutely adore and use all the time. I love that they’ve turned a fun but somewhat lengthy task into something I can whip together almost every day.
I use a large sealable container, though you never seal the dough when making it. I do use the top to keep the dough from drying out in the fridge, however, by placing it loosely atop the container.
So, step one is to get those three cups of water from the tap and place them in the container. You want the water to be warm but not hot. If it isn’t warm, that’s fine, but it will take a little longer for the little yeasties to wake up and rise. Add the salt, yeast, and flour. Yep, all at once.

Use a spatula to stir it. Yep, just stir it. This is the no knead thing, remember? Stir until the flour is all incorporated. You don’t want any wet or dry patches, but that’s about it. It will be sticky, and there’s truly no kneading, which is very unlike any bread I generally make. Trust me though. It works. These people have a whole series of books on making tons of different breads using this methodology. (So anyone looking for a birthday or Christmas gift for me, ahem.)

That’s it. Once you’ve got the dough to this point – which will take you all of eight or nine minutes – place the lid carefully on the container (remember, this is a five-gallon container that you’re using) so that it is covered but not sealed, as you want the air circulating in the container to feed the little yeasties. Let it sit out on your counter for a couple of hours to rise.
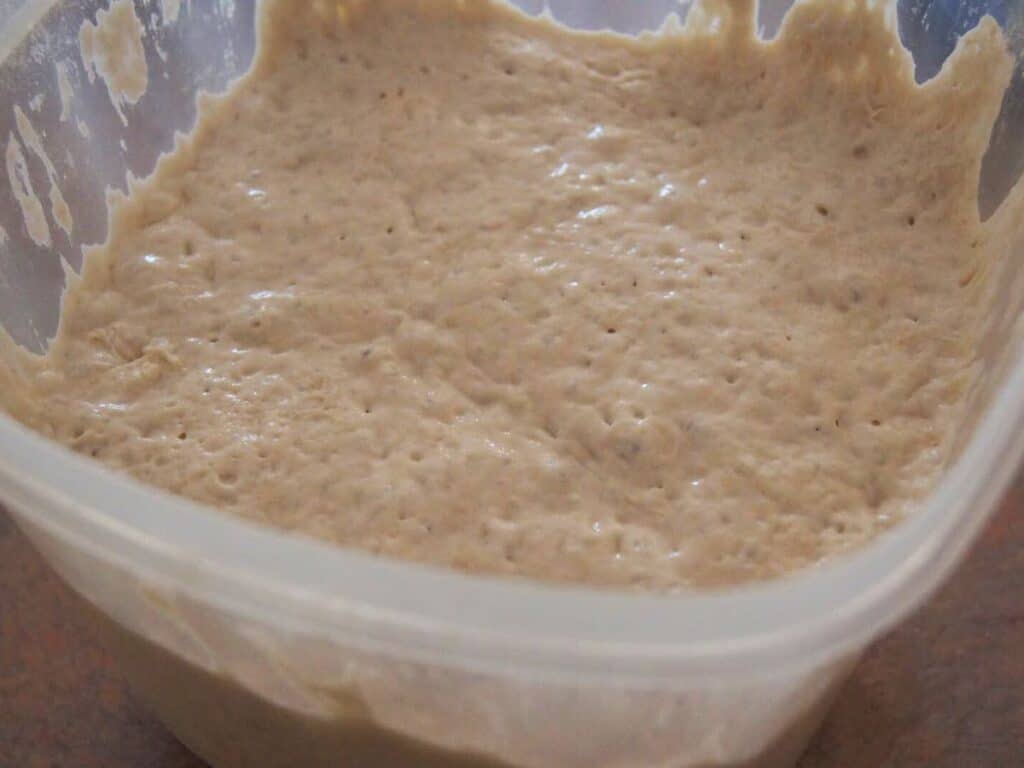
Yes, that’s the same dough. I didn’t touch it, but it’s so different. Once it’s risen and is nice and flat on top, then stick it in the fridge. It’s now ready for you to make bread whenever you want over the next week – whenever you have one hour in the house. Or most of an hour anyway.
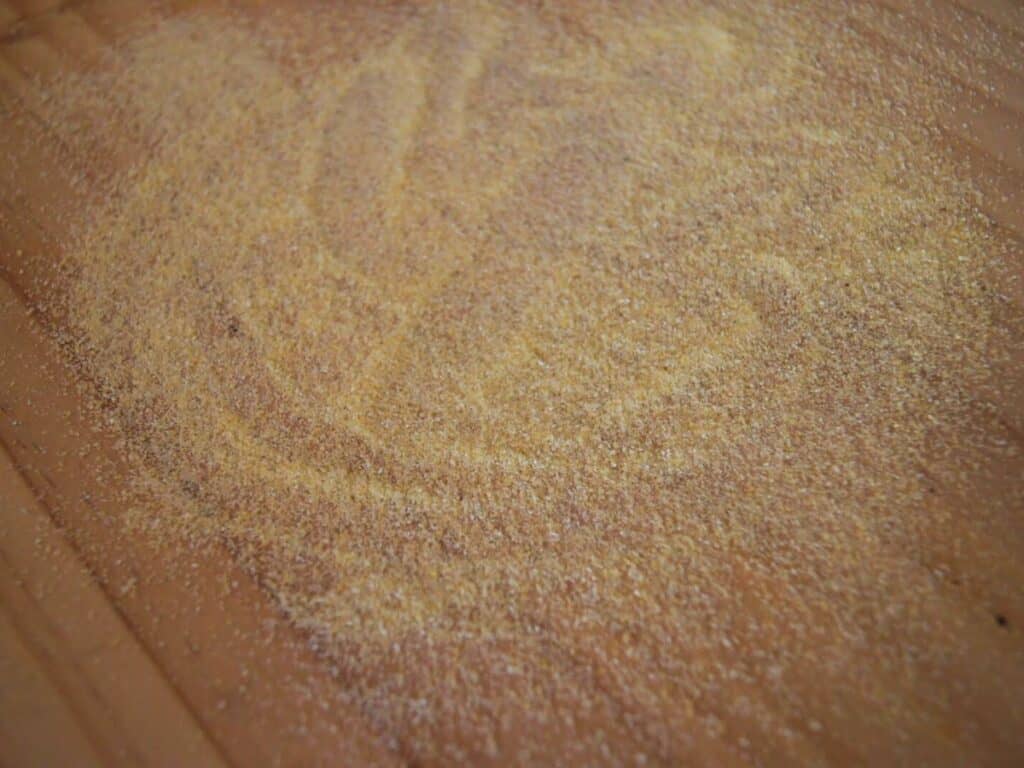
When you’re ready, prepare the pizza peel that you use to get the bread in and out of the oven. This is where the bread will rise, as well. Sprinkle it with cornmeal. This is what will keep your bread from sticking to the peel and losing all its rise when it goes in the oven. Make sure you’re generous – far more generous than you normally are when doing this. I learned this lesson the hard way the first time I made this bread.
Once you’ve done this, sprinkle some flour atop the dough to make it easier to handle without sticking to you constantly. Carefully take a hunk of dough from your container. Think about how much water and flour and such you used to make this dough. This is plenty of dough for several loaves of bread, and I generally take about a quarter of it for each loaf. And yes, I say about. You don’t have to be exact; it’ll all be ok.
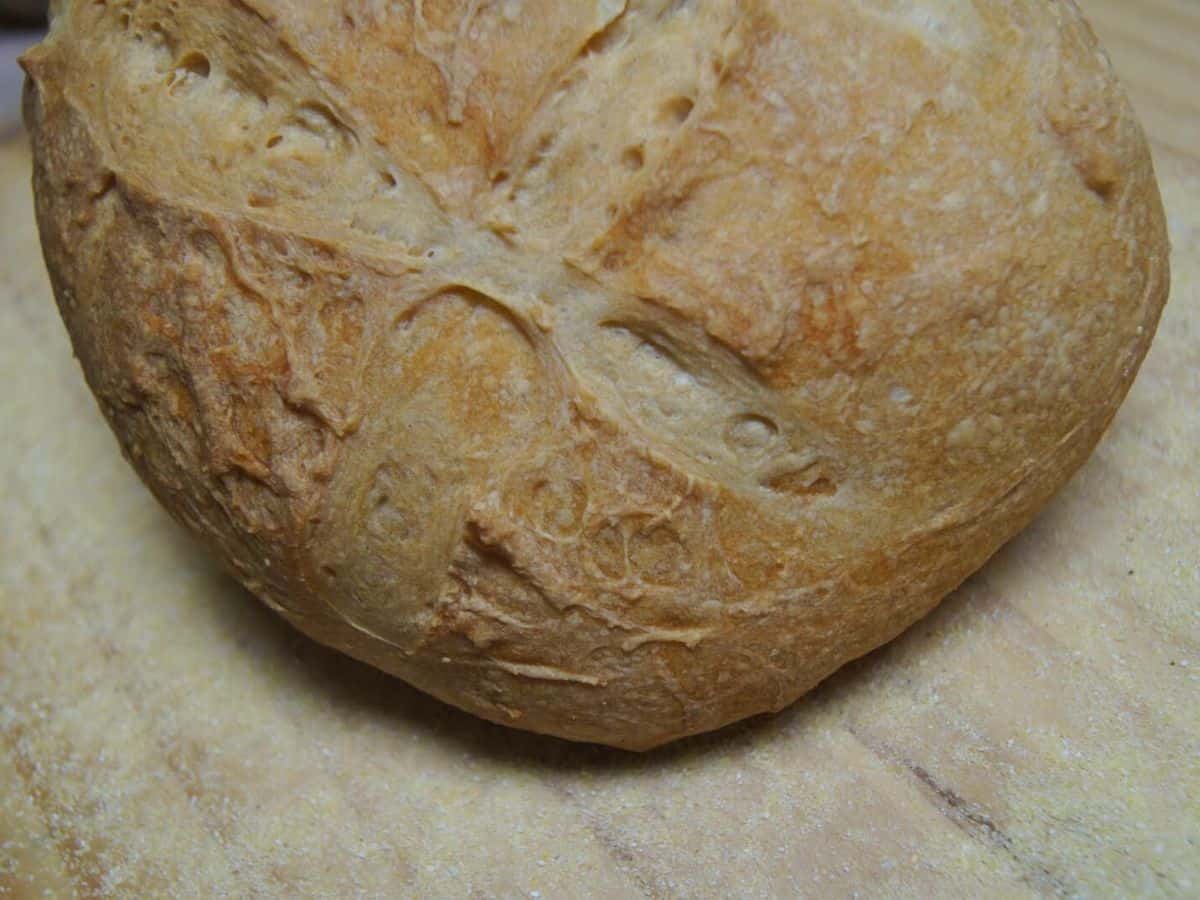
If you need to, sprinkle a little more flour atop the hunk you removed. Form it into a ball by stretching the dough outward from the center and pushing it under, not by rolling it. Once it’s formed into a semblance of a circle, place it on your peel to let it rise. You do not need to cover it with this recipe. Let it rise for twenty minutes, then start preheating your oven to 450 degrees with a stone in the bottom third of the oven. Have a small pan below the stone where you can add water, as well.

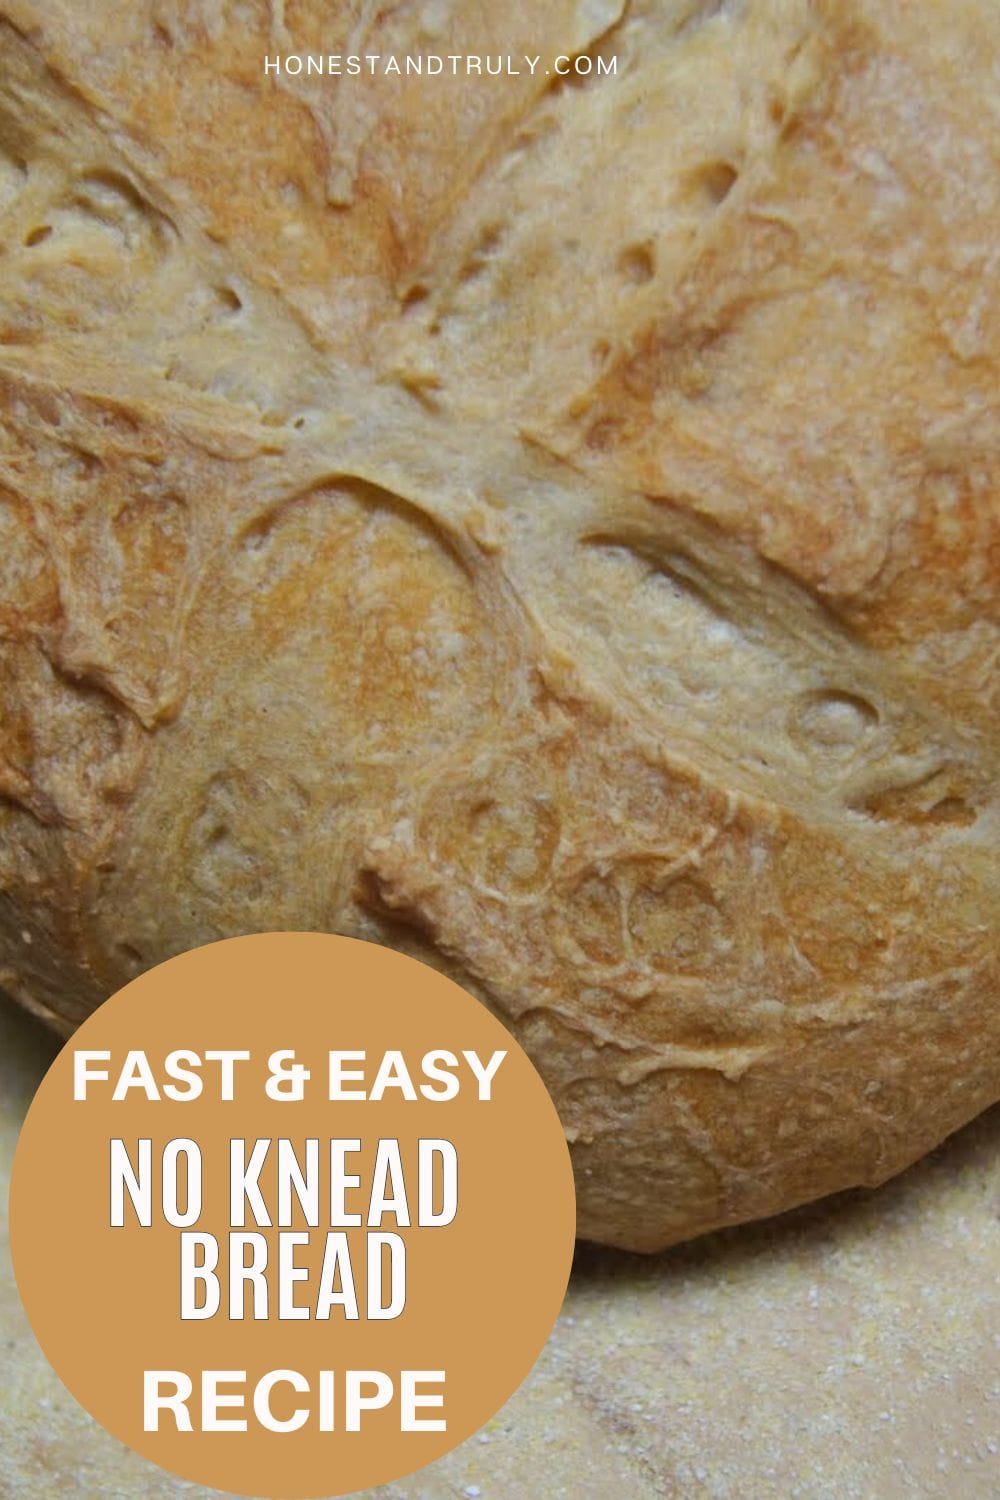
Once your oven has preheated for twenty minutes (see – most of this “work” is time you can be doing laundry or making the rest of your dinner) for a total of forty minutes rising time, you’re ready to bake it. Use a sharp knife to add slashes to the top of the bread dough to a half-inch depth. I do mine either in a tic-tac-toe pattern or like a shell. Add a cup or two of water to the pan in the oven, then quickly slip the dough onto the stone.
Bake it for 30 minutes, then remove it. Technically, you want to wait until it cools before cutting it, but really? Does it ever happen? Tell me it isn’t just our house where we can’t wait for our bread to cool before we eat it. Don’t store it in the fridge. Please don’t store bread in the fridge. Don’t put it in plastic either. Let it cool completely before you cover it.
And that leftover dough? Back into the fridge, it goes until the next day when you make more fresh bread with almost no effort. When you’ve used up the last of the dough, there will be a little bit left in the container sticking to the edges. Don’t bother washing it out. It’s ok. Just make another batch, and the bread will start to have a sourdough flavor to it, yum!
Are you convinced yet?
No Knead Bread
Ingredients
- 3 cups warm water
- 1 tablespoon salt
- 1 1/2 tablespoons yeast
- 6 1/2 cups flour
Instructions
- Step one is to get those three cups of water from the tap and place them in the container. Add the salt, yeast and flour. Use a spatula to stir it.3 cups warm water, 1 tablespoon salt, 1 1/2 tablespoons yeast, 6 1/2 cups flour
- Stir until the flour is all incorporated. You don’t want any wet or dry patches, but that’s about it.
- Once you’ve got the dough to the point that it is sticky – which will take you all of eight or nine minutes – place the lid carefully on the container so that it is covered but not sealed, as you want the air circulating in the container to feed the yeasts. Let it sit out on your counter for a couple hours to rise.
- Once it’s risen and is nice and flat on top, stick it in the fridge. It’s now ready for you to make bread whenever you want.
- When you’re ready, prepare the pizza peel that you use to get the bread in and out of the oven. This is where the bread will rise, as well. Sprinkle it with cornmeal. This is what will keep your bread from sticking to the peel and losing all its rise when it goes in the oven.
- Once you’ve done this, sprinkle some flour atop the dough to make it easier to handle without sticking to you constantly. Carefully take a hunk of dough from your container.
- If you need to, sprinkle a little more flour atop the hunk you removed. Form it into a ball by stretching the dough outward from the center and pushing it under, not by rolling it. Once it’s formed into a semblance of a circle, place it on your peel to let it rise.
- You do not need to cover it with this recipe. Let it rise for twenty minutes, then start preheating your oven to 450 degrees with a stone in the bottom third of the oven. Have a small pan below the stone where you can add water, as well.
- Once your oven has preheated for twenty minutes for a total of forty minutes rising time, you’re ready to bake it. Use a sharp knife to add slashes to the top of the bread dough to a half inch depth. Add a cup or two of water to the pan in the oven, then quickly slip the dough onto the stone.
- Bake it for 30 minutes, then remove it. Don’t store bread in the fridge. Don’t put it in plastic either. Let it cool completely before you cover it.


Notes
- You want the water to be warm but not hot. If it isn’t warm, that’s fine, but it will take a little longer for the yeast to wake up and rise.
- Put the leftover dough back in the fridge until the next day when you make more fresh bread with almost no effort.
- When you’ve used up the last of the dough, there will be a little bit left in the container sticking to the edges. Don’t bother washing it out. Just make another batch, and the bread will start to have a sourdough flavor to it.
- For more tips and tricks, be sure to read the full article above.
Nutrition
This site uses an online source to provide nutrition estimates as a courtesy. If you need exact values, please calculate yourself.
I am a participant in the Amazon Services LLC Associates Program, an affiliate advertising program designed to provide a means for sites to earn advertising fees by advertising and linking to Amazon.com.
Win one of 3 sets of 25 holiday cards from Shutterfly
Win a $100 gift certificate to Red Envelope

LOVE this! i can't wait to give it a try. i don't have a bread peel–do you think i can make something else work instead?
I LOVE fresh baked bread… I'm going to have to give it a shot and see if I can make it work in my wee, tiny little countertop oven, since we don't have a regular, full-sized one.
This is even homemade bread I can make!
Sounds easy enough. I don't have a pizza peel, either. Maybe it's something I need to ask for for Christmas. I'm scared of yeast… I haven't used it yet.
This is awesome! My family is huge bread eaters! I am definitely going to do this!! Thanks!
mmmmmm I can smell it from here! If I tried that you could probably build a house with them! ~snicker~ I'm your latest follower. Nice to meet you! Came over from your give-away!
Wow, this is almost like magic. Never heard of no knead bread. Can't wait to try it! Love, love, love fresh bread. Thanks!
Melanie – You can definitely make it in a loaf pan (GREASED), too. I do mine free form because I like the crackly crust all around.
Raevyn – I assume it would work in a countertop oven. It's certainly a small enough loaf 🙂
Tara – Definitely. I made 2 loaves of it to finish off a batch last night, and always so easy. And ummm just half a loaf left. I think I know what I'm doing this afternoon!
Paula – Yeast is your friend. People make it out to be much scarier than it is. And at Costco, it's super cheap so who cares if you mess up a few times?
Tami – Go for it. I don't buy bread from the store anymore because we always have this in winter. Such a huge savings!
Xmas Dolly – The smell of them baking is wonderful. I love that yeasty smell.
Sandra – It is almost like magic. And so forgiving, too, for the times when I forget that I have some rising on the counter and all. Ahem.